How to Build a Mousetrap Car
The process of building a mousetrap car could bring you unlimited fun especially when a father and his son spend their time together. The fun is unimaginable and the steps are relatively simple. You may download some basic mousetrap car designs if this is your first time building a mousetrap car. Otherwise, if you are looking to build a fast cool mousetrap car, you will need a better designed car plans. A well-designed mousetrap car plans allows your car to go faster and further. If you are heading to any mousetrap car competitions in your schools or class, perhaps these few simple tips and steps to build a fast mousetrap car could help you out.
Material Needed
- Wheels. Prepare a piece of cardboard or foam core and elastic rubber bands.
- Axle. Here we will use two dowel rods as the axle for the car.
- Car Body. Of course it is a mousetrap. A better quality mousetrap will give you faster pickup. Look carefully the spring condition when buying one.
- Tools: A pair of pliers, a pair of scissors, a pair of compass, epoxy glue, duct tape, 4 eye hooks, ruler, utility knife, and a flexible string.
Step 1: Create a set of four cool wheels using heavy cardboard. Use a pair of compass to measure the wheel size properly. Prepare four wheels where two wheels for the front are slightly smaller than another two. Use the elastic bands and attach it around the perimeter of the wheels you have just created. These bands work like car tires for the car. Make a small hole in the center of every wheel for the dowel rod.

Step 2: Use a utility knife to cut a piece of cardboard as the chassis. It must be slightly bigger (10-12cm) than the mousetrap on each side. Remove the rod on your mousetrap using a pair of pliers carefully. Place the mousetrap on the cardboard you just prepare and lock it with duct tape on each side.
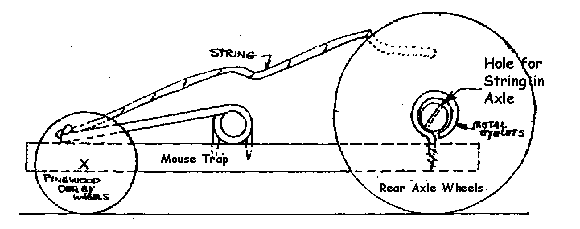
Step 3: The third step is to build the axle of the car. Prepare 2 dowel rods which are slightly thinner than the eye hooks. Measure the size and make them 1-2 inches longer than the width of your chassis. Twist the four eye hooks into each corner of the chassis. This is to hold the axle.

Step 4: Slide both dowel rods through the eye hooks. Make sure it is able to spin nicely. Fix each wheel to the dowel rod through the hole you made in step 1. Secure the wheel with rubber band and apply some epoxy glue.
Step 5: Tie one end of a string to the snapper arm of the mousetrap. Make a tight knot so that it won’t lose when the car runs. In order to make the car run, you will need to pull back the snapper arm and hold it tightly. Now wind the other end of the string around the rear axle (rear dowel rod) while you are holding back the snapper arm. Make sure you wind it with the right direction in order to make the car go forward. How to make it run then? Simply put the car on the ground and release your hand. You will notice the snapper arm jumps instantly and the power will be delivered to the rear wheel and make the car runs. Prepare a longer string if you want the car to travel further.

Don’t worry if you feel your head is dizzy after reading the above instructions. You can always head to any online stores and get a set of ready-made mousetrap car kits. They are easier to build.