Tag: online

advertisements
  • Make Your Own Pokemon Card

    Make Your Own Pokemon Card

    “Oh My Goodness! That’s his face on his Pokemon card!” Make your own Pokemon card will bring you unprecedented joy and fun because each card you made is unique and they are not available for sale elsewhere. In this article, we will show you how to make your own Pokemon card online in a few easy steps. There are a few popular Pokemon card maker but we are going to show you how to create a unique Pokemon card for free. You don’t have to buy it and you can just print it out using your own printer.

    pokemon-card

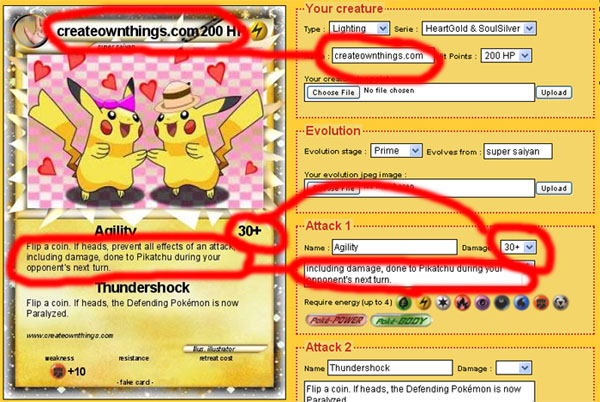
    Step 1: There are two popular online Pokemon card makers which are Trading Card Maker and My Poke Card dot com. In this tutorial we will teach you how to create a Pokemon card with My Poke Card. First, go to mypokecard.com and you will see a sample Pokemon card on your left. There is a form on your right where you can choose your own creature’s name, type, series, and its hits points. The sample Pokemon card is animatedly updated by filling out the form.

    Step 2: Give your unique Pokemon card a unique name. Let’s start with “Your creature”. You can choose the type of card you prefer in this section. It can be Fire, Grass, Water, Lighting, Psychic, Fighting, Colorless, Darkness, or Metal. Next is the series where you can choose any one from 1st generation, Diamond & Pearl, or HeartGold & SoulSilver. Here comes the main show, the name of your own Pokemon card and the hit points. Create a real cool name for it and don’t make it sounds gay. Last but not least, choose a cool photo and upload it.

    make-pokemon-card

    Step 3: The next thing to do is to select the evolution stage. If you select Basic, it will be a normal Pokemon card. Stage 1, Stage 2, and Prime will make the card look cooler. You can upload any jpeg image for your evolution.

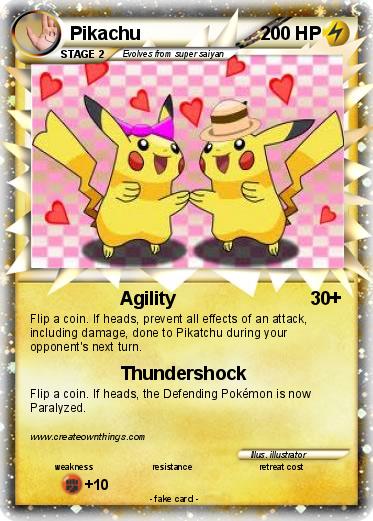
    Step 4: Create both Attack 1 and Attack 2 for your Pokemon card. Usually we will put Agility for Attack 1 and Thunderstock for Attack 2 but it is all up to what you prefer. You can also select both the damage level.

    Step 5: Put comments and illustrator. Whatever you type into the comment box will be appearing at the card as flavor text as shown in the image here. As for the illustrator, the space on the card is limited thus we recommend you to put a word with less than 20 characters.

    make-pokemon-card-2

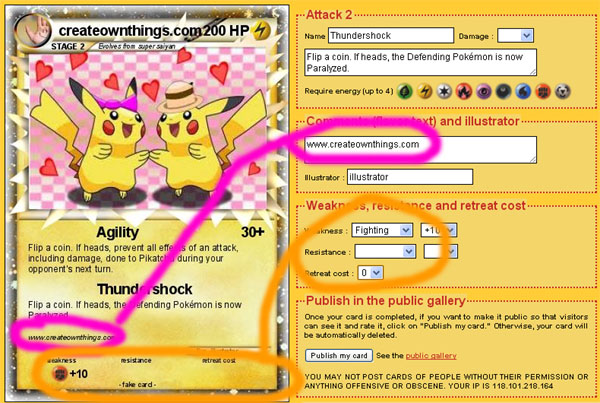
    Step 6: The last step to make your own Pokemon card look perfect is to select the weakness, resistance, and retreat cost. The online application allows you to select +10, +20, +30, +40, or x2 for Fire, Grass, Water, Lighting, Psychic, Fighting, Colorless, Darkness, or Metal. Once you have selected the weakness and resistance, you can select any retreat cost from 0-4. Once you have satisfied with your own design, right cligh the image on your left and save it to your computer. You can then print it out with your printer easily. That’s how to make your own Pokemon card online for free! Isn’t it so easy?

  • Design your own tattoo

    Design your own tattoo

    Do you know that having tattoo is like having drug? You may worry it hurts you during the process. However, if you have gone through the process for the first time, you may want to get more and more tattoos on your body. Indeed, tattoos are addictive. There are many ready made tattoo designs available at tattoo shops, having one or two is good but you will have to design your own tattoo if you want a really cool one. Here in this article RYU is going to share you some tips to create your own tattoo. Make sure you create it in a unique way so that other people who look at it will shout “Hey, that tattoo is so so so cool! Where do you get that?” Before you begin, make sure your age is eligible to be tattooed. In some state such as Georgia, you must be 18 years old in order to get tattooed.

    Where do you want to be tattooed?

    So, how to create one tattoo that is truly unique? First of all, decide where you want to be tattooed. This is important because not all body parts are shaped equal. You can be tattooed in any part of your body including private area. You can choose to be inked at one of the top ten famous places such as: lower back, wrist, foot, ankle, armband, back or back-piece, arm, chest, breast, or neck. Perhaps lower back is the first preference for a girl getting her first tattoo because it is exposed at the beach while wearing bikini but covered up from the rest of the world.

    sexy lower back tattoo
    Sexy lower back tattoo

    Use symbols

    Design your own symbols is always a great idea if you are able to draw something out of nothing. Once you have created your own symbol, bring it to a tattoo artist and have him consult you. An experience tattoo artist can always refine your ideas and make it a better one for you. Thus, if you don’t prefer to use any words for your tattoo, use symbols!

    symbolic tattoo
    Symbolic Tattoo

    Use your own philosophy

    Once you have created your own symbol or logo, it would be nice if you can put on your own philosophy on it. It can be either a sentence or just a few meaningful words.

    Use the right colors

    Choosing the right tattoo colors is very important. Dark-skinned person may not have the same results as a fair-skinned person. If your skin is darker, you may choose a brighter color but that does not mean you can’t choose any darker colors. It is all depends on your own design as well as the entire concept. Generally, yellow color is prone to fading faster than other others over the time. Colors that can be last longer are usually those darker colors such as black.

    colorful tattoo
    Colorful Tattoo

    Express yourself honestly

    Nowadays, tattoo is no longer just a piece of art that inked to human’s body. It is also an art where oneself can express honestly to another. Therefore, it is important for you to think how you can express yourself honestly to another when design your own tattoo. For example, a woman who has a tiger tattoo at her lower back is expressing three things – sexy, sensual, and sentimental. Have you got your own idea now?

  • How to Build a Mousetrap Car

    How to Build a Mousetrap Car

    The process of building a mousetrap car could bring you unlimited fun especially when a father and his son spend their time together. The fun is unimaginable and the steps are relatively simple. You may download some basic mousetrap car designs if this is your first time building a mousetrap car. Otherwise, if you are looking to build a fast cool mousetrap car, you will need a better designed car plans. A well-designed mousetrap car plans allows your car to go faster and further. If you are heading to any mousetrap car competitions in your schools or class, perhaps these few simple tips and steps to build a fast mousetrap car could help you out.

    Material Needed

    • Wheels. Prepare a piece of cardboard or foam core and elastic rubber bands.
    • Axle. Here we will use two dowel rods as the axle for the car.
    • Car Body. Of course it is a mousetrap. A better quality mousetrap will give you faster pickup. Look carefully the spring condition when buying one.
    • Tools: A pair of pliers, a pair of scissors, a pair of compass, epoxy glue, duct tape, 4 eye hooks, ruler, utility knife, and a flexible string.

    Step 1: Create a set of four cool wheels using heavy cardboard. Use a pair of compass to measure the wheel size properly. Prepare four wheels where two wheels for the front are slightly smaller than another two. Use the elastic bands and attach it around the perimeter of the wheels you have just created. These bands work like car tires for the car. Make a small hole in the center of every wheel for the dowel rod.

    steps to build a mousetrap car

    Step 2: Use a utility knife to cut a piece of cardboard as the chassis. It must be slightly bigger (10-12cm) than the mousetrap on each side. Remove the rod on your mousetrap using a pair of pliers carefully. Place the mousetrap on the cardboard you just prepare and lock it with duct tape on each side.

    Step 3: The third step is to build the axle of the car. Prepare 2 dowel rods which are slightly thinner than the eye hooks. Measure the size and make them 1-2 inches longer than the width of your chassis. Twist the four eye hooks into each corner of the chassis. This is to hold the axle.

    mousetrap car diagram

    Step 4: Slide both dowel rods through the eye hooks. Make sure it is able to spin nicely. Fix each wheel to the dowel rod through the hole you made in step 1. Secure the wheel with rubber band and apply some epoxy glue.

    Step 5: Tie one end of a string to the snapper arm of the mousetrap. Make a tight knot so that it won’t lose when the car runs. In order to make the car run, you will need to pull back the snapper arm and hold it tightly. Now wind the other end of the string around the rear axle (rear dowel rod) while you are holding back the snapper arm. Make sure you wind it with the right direction in order to make the car go forward. How to make it run then? Simply put the car on the ground and release your hand. You will notice the snapper arm jumps instantly and the power will be delivered to the rear wheel and make the car runs. Prepare a longer string if you want the car to travel further.

    mousetrap car

    Don’t worry if you feel your head is dizzy after reading the above instructions. You can always head to any online stores and get a set of ready-made mousetrap car kits. They are easier to build.